
Is your solar panel polarity correct? If you are not sure, check before you connect anything to your portable power station. Many users focus only on whether the connector fits — but polarity, voltage, current, and cable quality all matter too.
A matching connector does not guarantee electrical compatibility.
Before you plug in your panels, verify that electricity is flowing in the right direction. If you skip this check, your power station may show 0W input, refuse to charge, or risk damage to the input circuit — depending on its protection design.
This guide shows you exactly how to check solar panel polarity using a multimeter, step by step. If you are using MC4 cables, third-party adapters, or mixing solar hardware from different brands, this check is not optional.
Solar Panel Polarity Visual Troubleshooting Carousel
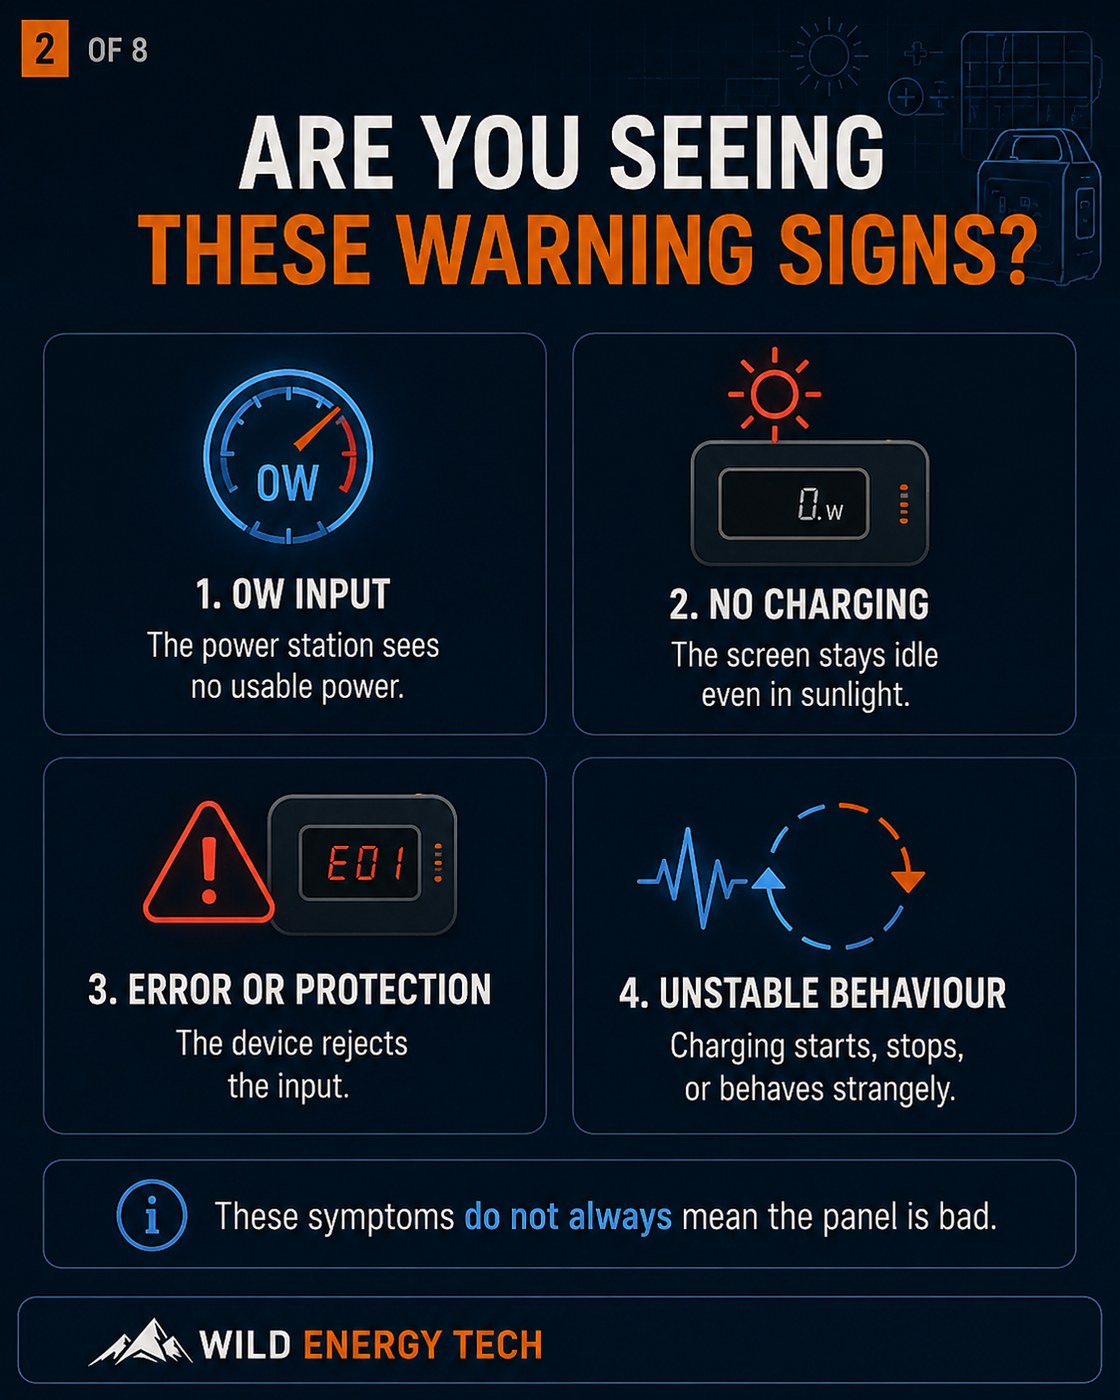
Use this visual carousel to check what may be happening before you blame the solar panel. If your power station shows 0W, refuses to charge, or behaves strangely, these slides help you check polarity, adapters, connector type and input limits first.

← Swipe or scroll to view all 8 slides →
Safety Display Case
Solar Panel Polarity: What Must Be Checked First?
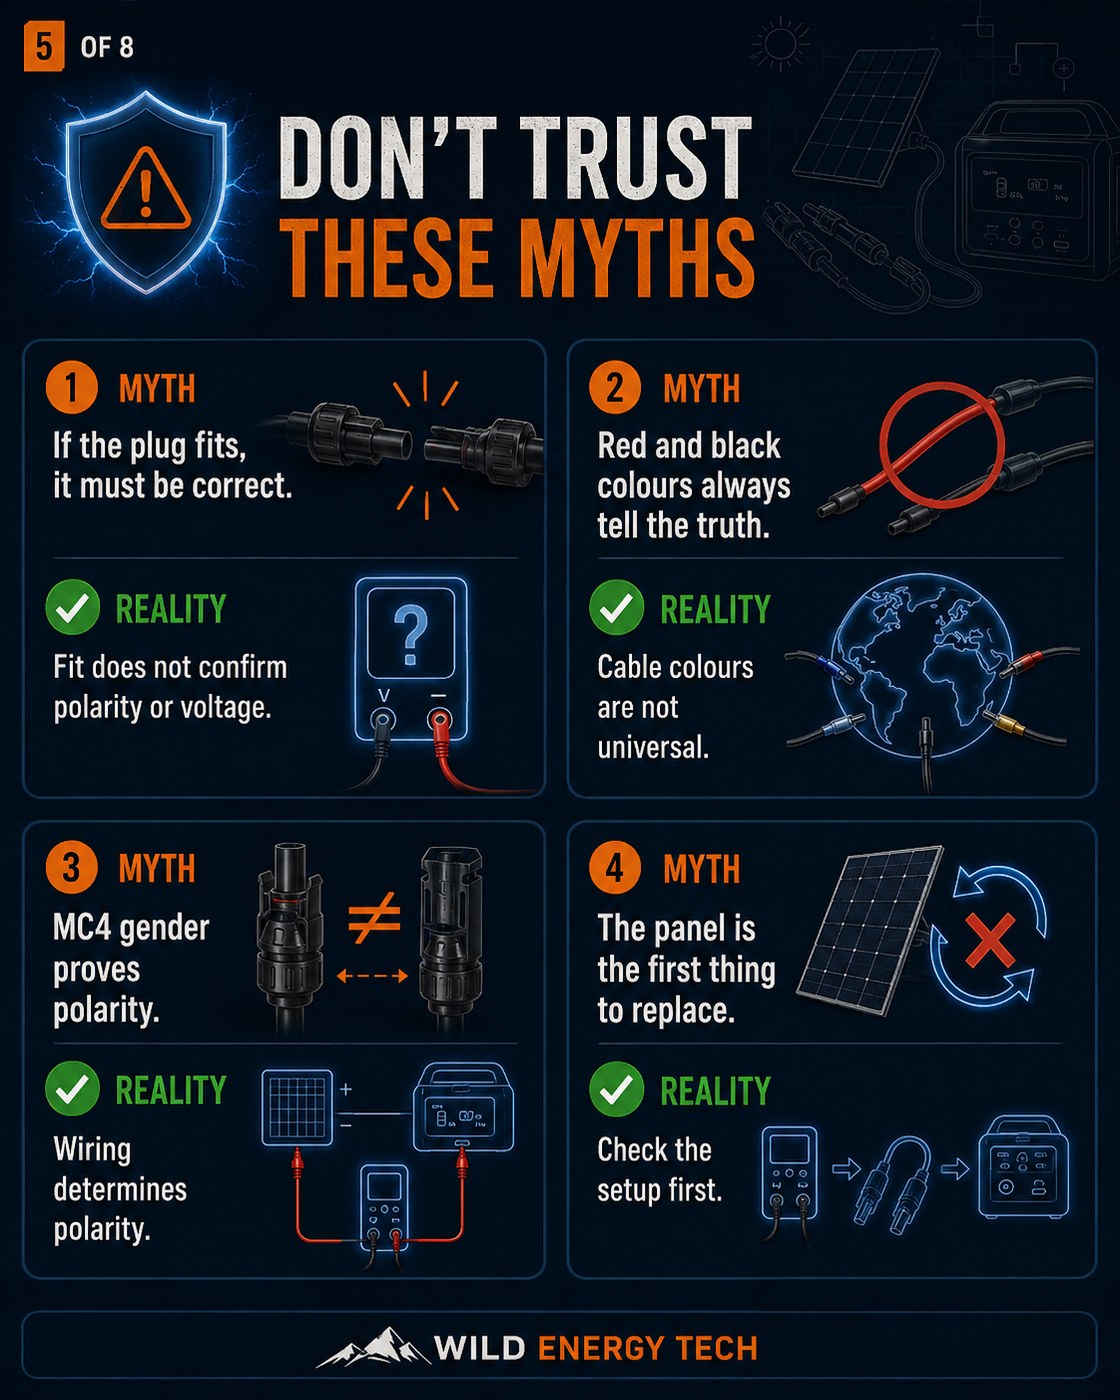
Solar panel polarity tells you which wire is positive and which wire is negative. A connector that fits physically can still be wired incorrectly, especially when using adapters, extension cables, or mixed-brand solar panels. Always confirm polarity before connecting third-party hardware to a portable power station.
Positive / Negative
Identify the leads
- Look for + and − markings on the panel, cable, or adapter.
- Do not rely only on connector shape.
- Mixed-brand adapters may not follow the same wiring layout.
- Wrong polarity can prevent charging or damage equipment.
MC4 Warning
Housing vs metal pin
- MC4 male/female wording can be confusing.
- It may refer to the outer housing or the inner metal contact.
- The positive lead often uses a female housing with a male pin inside.
- Always verify instead of assuming.
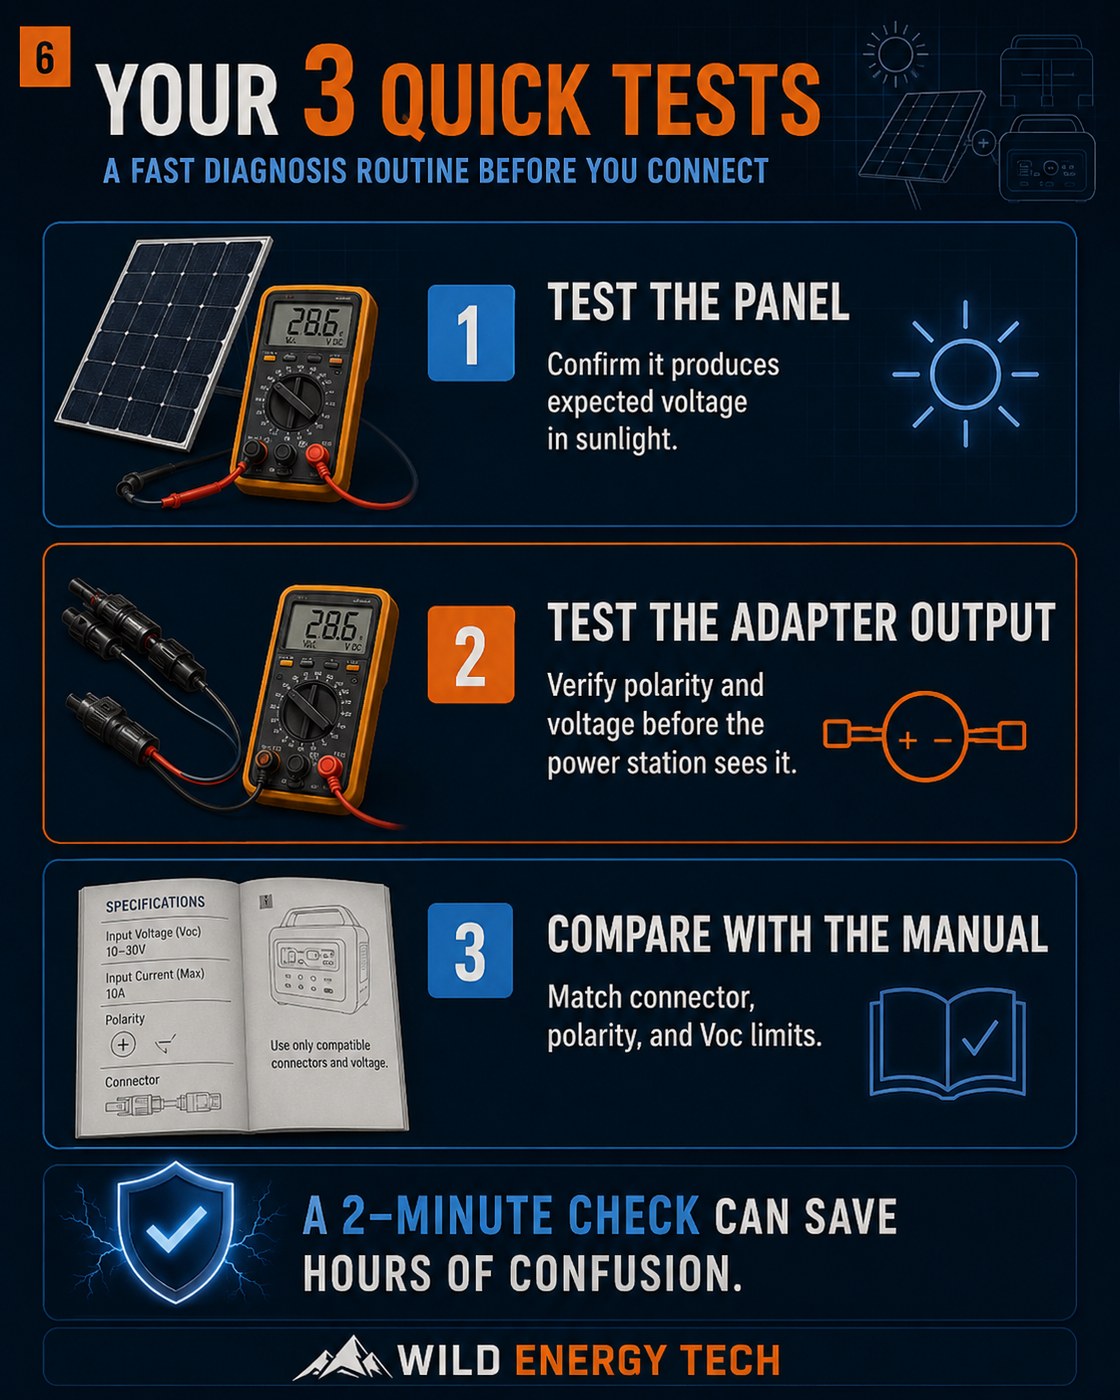
Safe Polarity Check
- Step 1: Check the + and − markings on the panel and adapter.
- Step 2: Use a multimeter to confirm polarity before connecting.
- Step 3: Confirm the voltage is also within the power station’s solar input limit.
| Check | What to verify | Why it matters |
|---|---|---|
| Polarity | Positive and negative are correctly matched | Reverse polarity can stop charging or damage the input circuit. |
| Connector fit | Connector seats normally without force | A fitting plug does not prove correct wiring. |
| Voltage | Panel Voc stays below the power station limit | Correct polarity does not make an over-voltage setup safe. |
Why Solar Panel Polarity Matters
Do you know what happens if polarity is reversed? DC electricity flows in one direction only — positive to positive, negative to negative. Your portable power station is designed to receive power in that specific orientation. Connect it the wrong way, and it may refuse to charge at all.
If that direction is reversed, what happens next depends on your specific power station. Some units will block charging. Others may allow reverse current to flow, which can permanently damage the input circuit or the adapter cable. Do not assume your unit has protection built in. Check your manual before you rely on it.
This is not a rare edge case. Reversed polarity is one of the most common problems when using third-party adapters or mixing solar hardware from different brands. If you have seen 0W input or no charging at all, polarity is one of the first things to check.
What Positive and Negative Mean on MC4 Solar Cables
Did you check which lead is positive before buying your adapter? Most solar panels use MC4 connectors — weather-resistant and secure, but easy to get wrong. A solar panel has two leads:
- Positive Lead: Commonly uses an MC4 female housing with a male metal pin inside, but adapter labelling and cable assemblies can vary. Always verify with +/− markings and a multimeter before connecting.
- Negative Lead: Commonly uses an MC4 male housing with a female metal socket inside, but this is not guaranteed. Always verify with +/− markings and a multimeter before connecting.
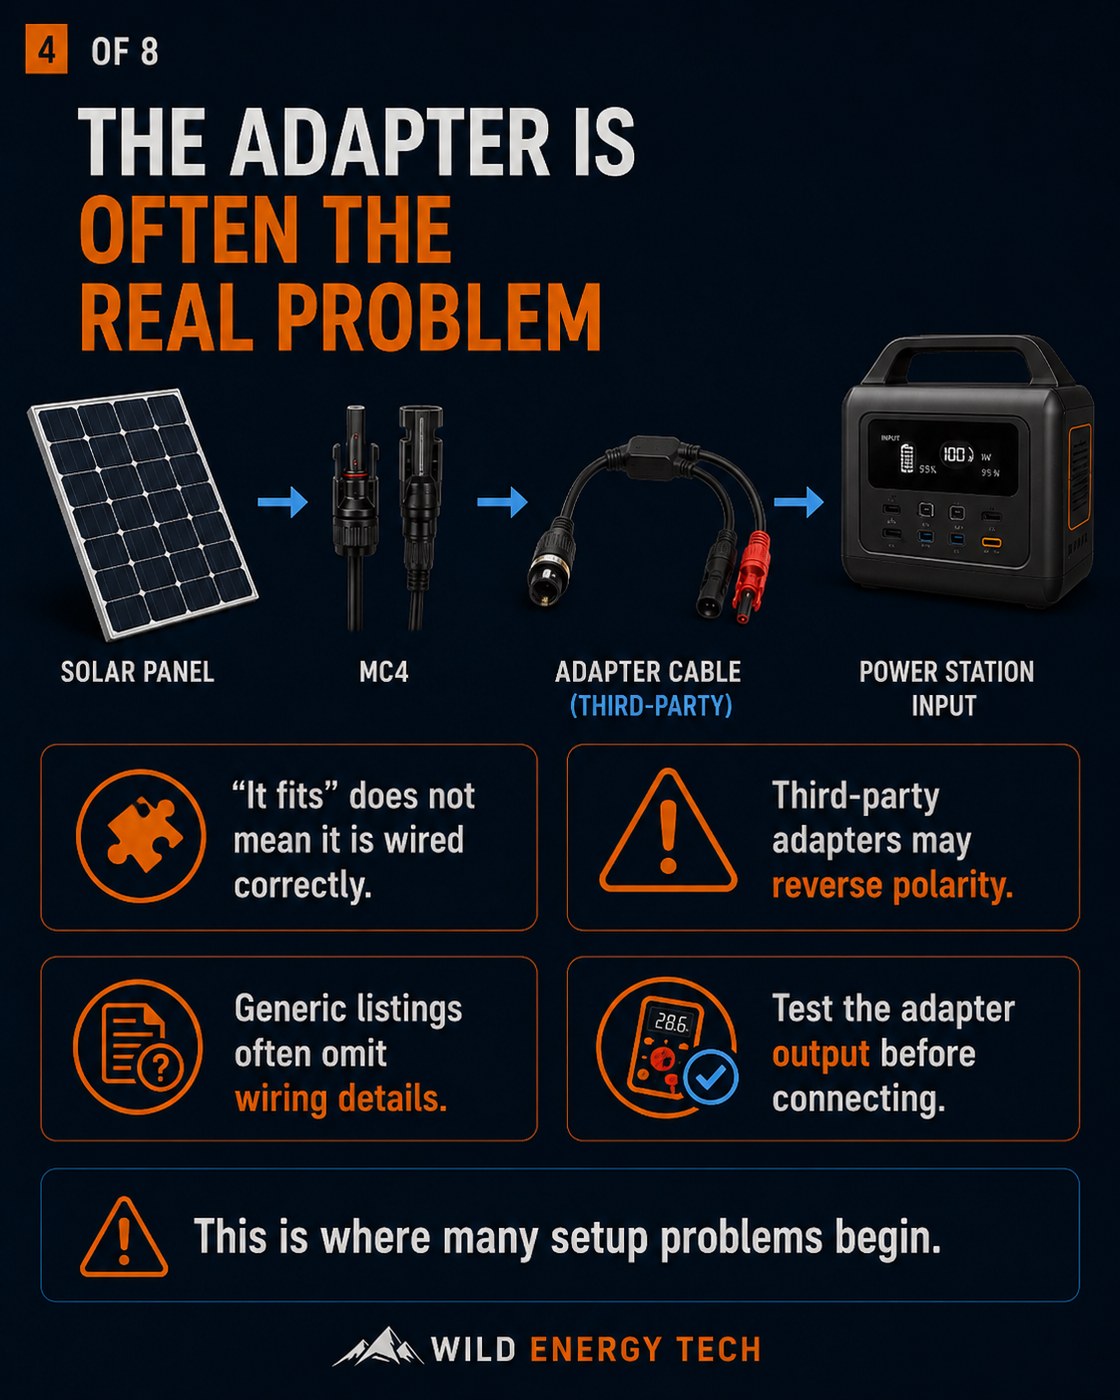
The problem is that “usually” is not good enough. When you introduce extension cables or MC4 to XT60i adapters, the polarity can flip without any obvious sign. This is the mistake many users make — they trust the label and skip the multimeter. Do not assume the markings on a cable are correct, especially with extension cables or mixed-brand adapters.
Tools You Need to Check Solar Panel Polarity
- Digital Multimeter: This is the most essential tool for any portable power station owner.
- Solar Panel: Unfolded and exposed to light.
- MC4 Leads: The cables coming directly from the panel.
- Adapter Cable: If you are testing the output of an adapter (e.g., MC4 to XT60).
- Safe Lighting Conditions: Bright enough for the panel to produce a measurable voltage, but avoid working in extreme heat.
- Power Station Manual: To confirm the expected input polarity and voltage limits.
For general electrical measurement safety, you can also review Fluke’s basic multimeter safety guidance.
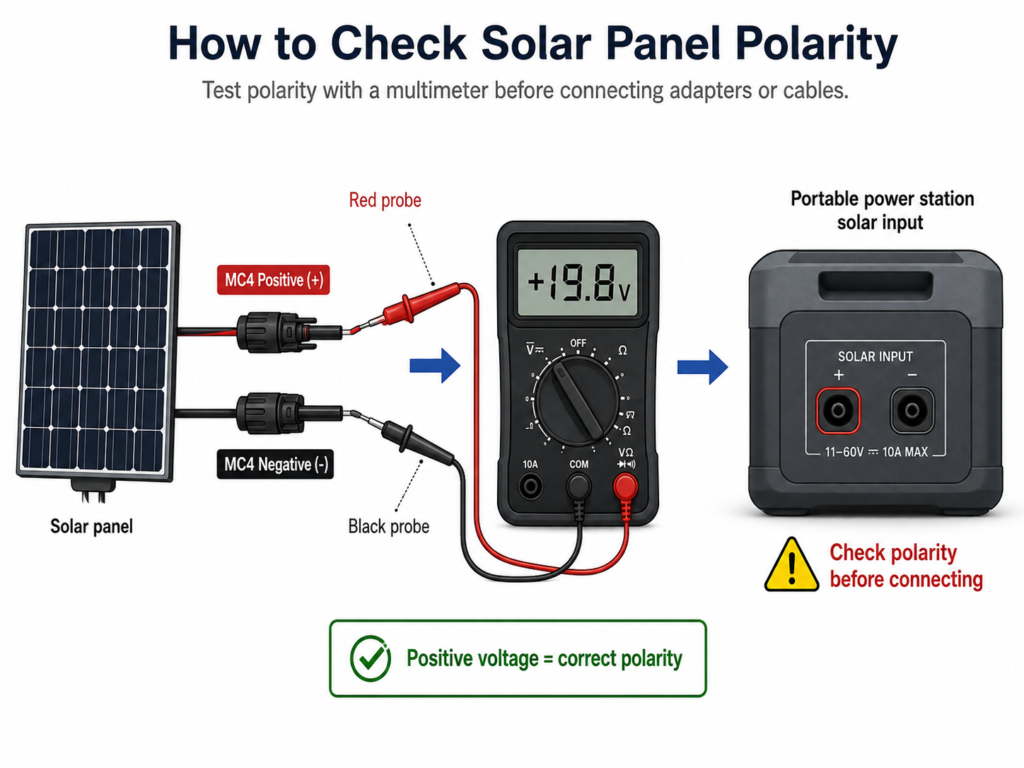
How to Check Solar Panel Polarity With a Multimeter
Here is how to do it. The whole process takes a few minutes and only requires a basic digital multimeter. Follow these steps carefully:
- Place the solar panel in sunlight: Even partial sunlight or bright overcast light should produce a measurable voltage.
- Set the multimeter to DC voltage: Look for the “V” with a straight line above it. Set the range to at least 100V if your meter isn’t auto-ranging.
- Connect the red probe: Touch the red (positive) probe of the multimeter to one of the solar connectors or the internal contact of an adapter.
- Connect the black probe: Touch the black (negative) probe to the other connector or contact.
- Read the voltage: Look at the multimeter screen. If you see zero or near-zero volts, the panel may not be getting enough light, or the probe tips may not be making clean contact.
- Identify the polarity:
- If the voltage displayed is a positive number (e.g., 19.8V), then the connector touched by the red probe is the Positive (+) side.
- If the voltage displayed is a negative number (e.g., -19.8V), then the probes are reversed. Swap them to find the correct orientation.
- Mark the cables: Once confirmed, use a piece of tape or a marker to identify the positive side clearly.
- Compare with specifications: Ensure the measured Voc is within your power station’s solar input voltage limit. Correct polarity does not make an over-voltage setup safe — if the voltage is too high, do not connect.
Quick Polarity Check Table
| Multimeter Result | What it Means | What to Do |
|---|---|---|
| Positive Voltage | Red probe is on positive; black probe is on negative. | Confirm voltage is within the power station input range. |
| Negative Voltage | Probes are reversed (red is on negative, black is on positive). | Swap probes and identify the correct positive/negative side. |
| No Voltage | Poor sunlight, bad contact, faulty panel, or wrong setting. | Check sunlight, cable connections, and multimeter settings. |
| Voltage Too High | Panel configuration exceeds your power station’s limit. | Do not connect. Check specifications and wiring (series vs parallel). |
What Can Go Wrong If Polarity Is Reversed
If polarity is reversed, you may see one or more of the following. Some are obvious — the last one is the easiest to miss and the most frustrating.
- Charging does not start: Many modern portable power stations include some form of input protection, but this is not universal and should not be relied on. Always check the manual for your exact model before connecting a solar panel or adapter.
- Error codes: The device may display an “Input Error” or “Overvoltage” warning.
- Warm or overheating adapters: If an adapter or cable runs warm during charging, check connector fit, cable gauge, and current draw. Overheating connectors or adapters should be inspected before continued use and are not a normal symptom of correct polarity protection.
- Blown fuses: Some older or cheaper models may rely on physical fuses that will pop.
- Hardware Damage: In rare cases — particularly with low-quality adapters that lack protection circuits — reverse polarity can damage the input port permanently. This is unlikely to be covered under warranty.
- Confusing Troubleshooting: Are you seeing 0W input and wondering if your panel is broken? Before you blame the panel, check the polarity. A flipped wire inside an adapter will look exactly like a dead panel from the outside.
Polarity Is Not the Only Safety Check
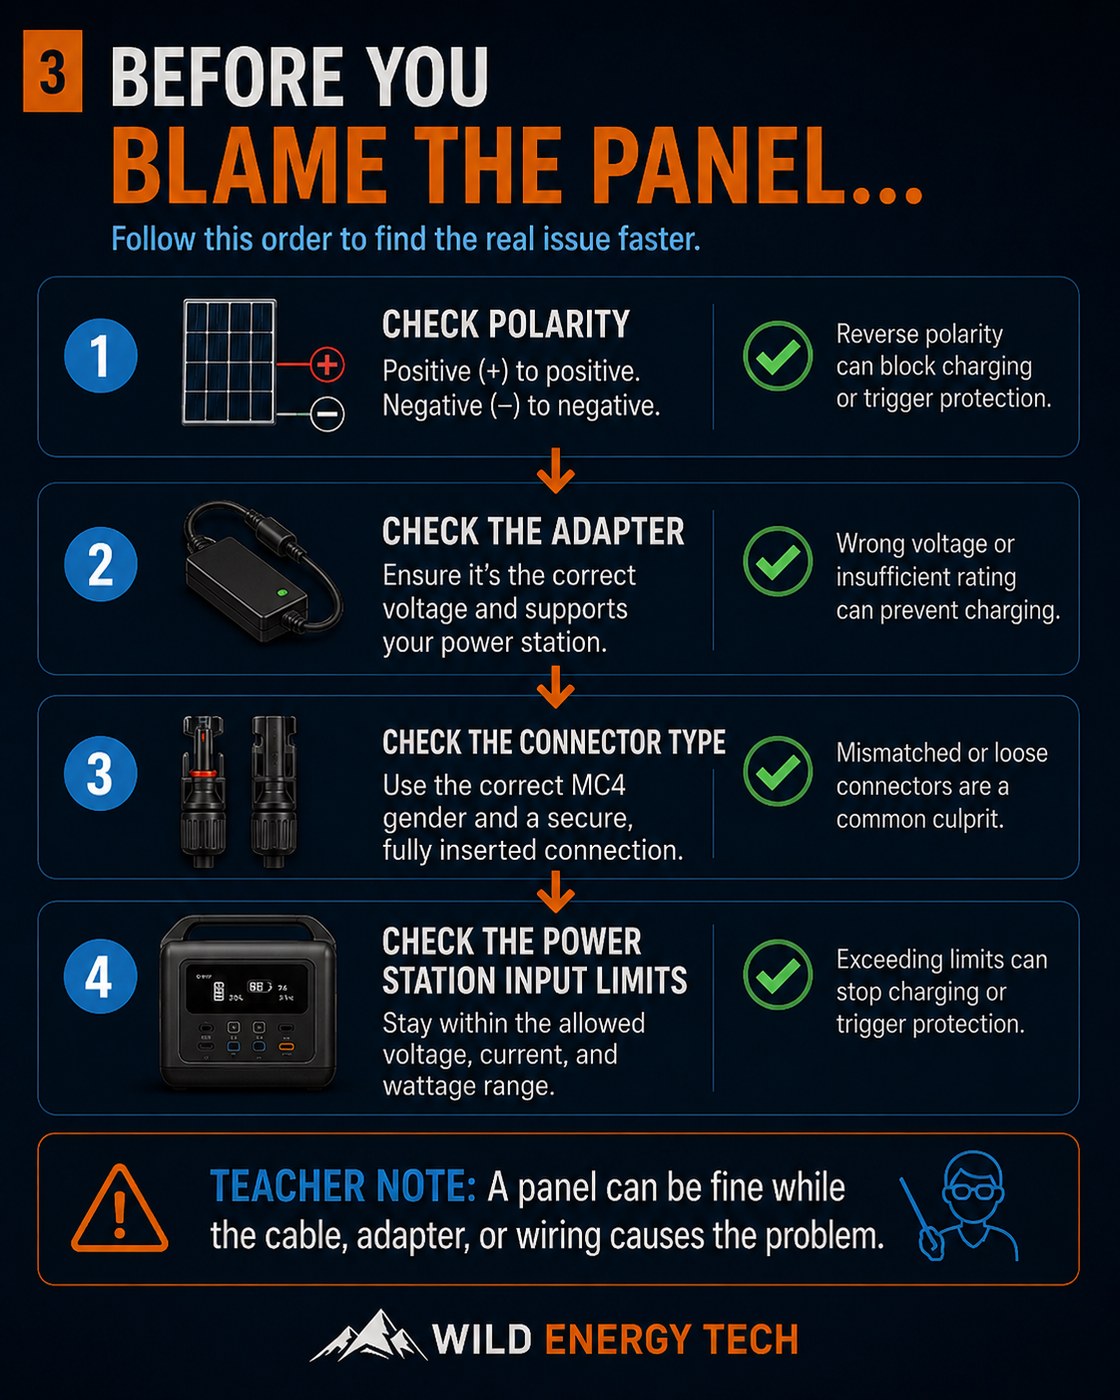
Polarity is critical — but it is only one part of getting your solar setup right. Before you connect, also check the solar charging optimisation guide. Here is what else needs to be confirmed:
- Open-Circuit Voltage (Voc): Must be LOWER than the station’s max input voltage.
- Maximum Input Current: The station will only pull what it can, but ensure your cables can handle the amperage.
- XT60 vs XT60i: Some EcoFlow units require the “i” variant for high-speed charging. If you are stuck at 8A on EcoFlow, this is often the cause.
- Connector Type: Ensure a tight, weather-sealed fit. Not sure which connector your panel uses? Use the visual connector guide to identify the connector type before buying an adapter.
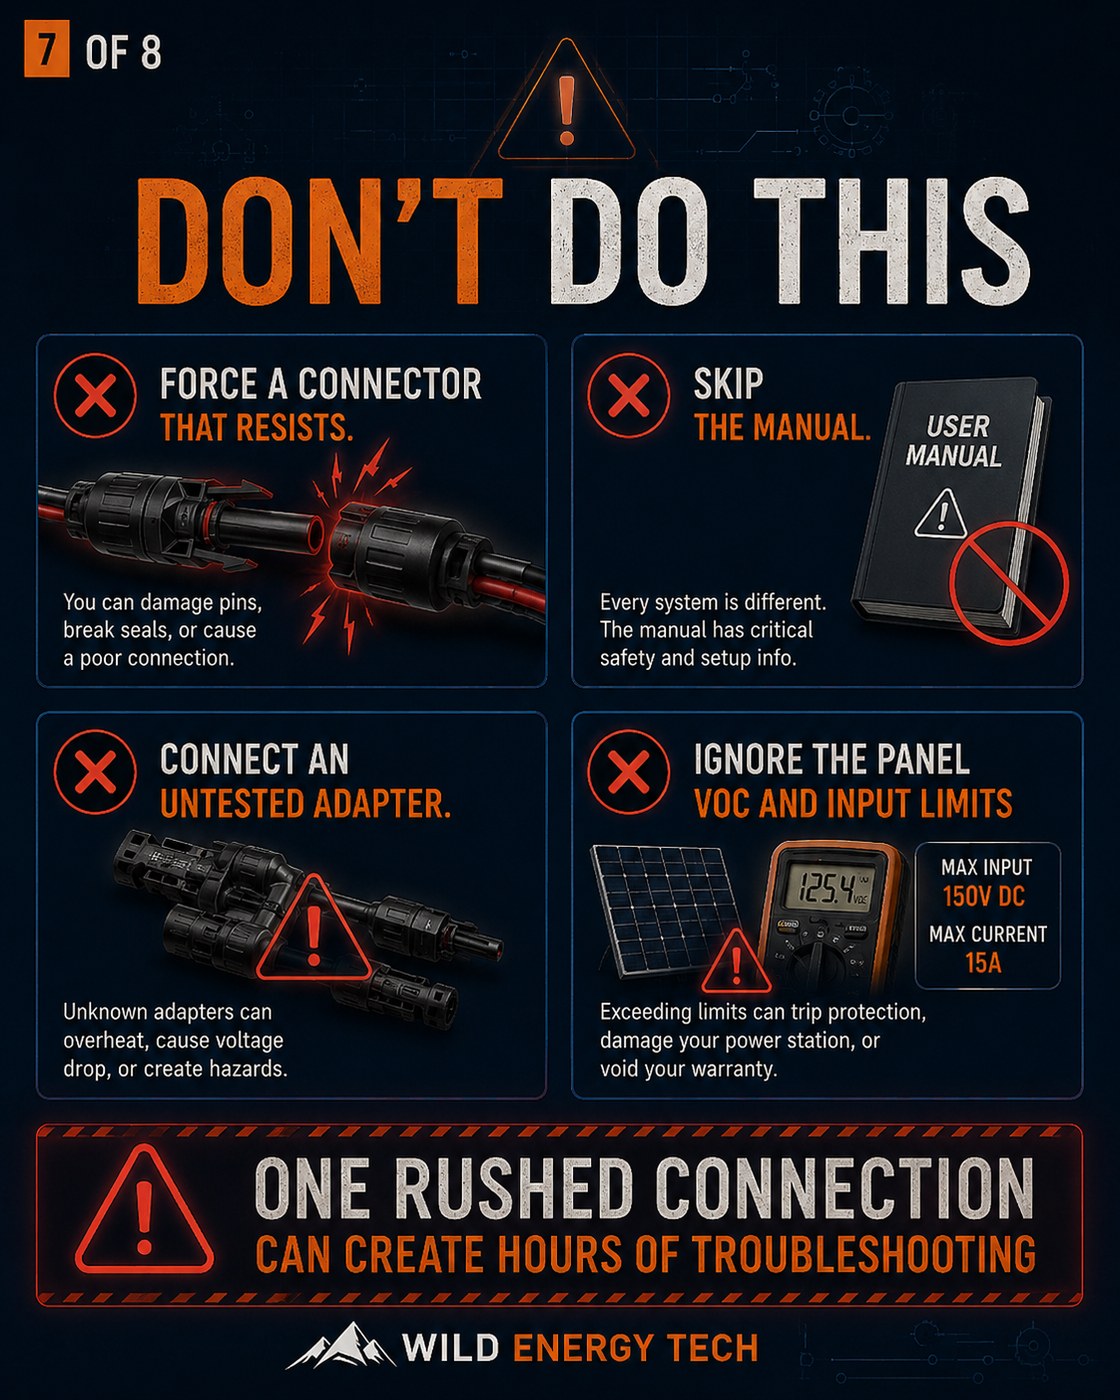
Common Mistakes to Avoid
- Assuming MC4 is a standard: Did you check the wiring on your new adapter before connecting it? Two MC4 connectors that look identical can have opposite polarity. Different manufacturers wire them differently — always verify.
- Buying by shape only: If an adapter physically fits, it is tempting to assume it is correct. It is not a safe assumption. Check the polarity with a multimeter before trusting any new adapter, regardless of shape or brand markings.
- Ignoring Series vs Parallel: Are you connecting more than one panel? Connecting in series adds voltage — two panels can roughly double it. That can easily exceed your power station’s input limit if you have not checked the spec sheet first.
- Using cheap, unverified adapters: I suggest you verify any low-cost adapter with a multimeter before connecting it. Reversed wiring and undersized cable gauges are both common on budget adapters, and neither is obvious from the outside.
- Testing after failure: The polarity check takes two minutes. Do it before the first connection — not after you have already seen an error code or 0W input on the screen.
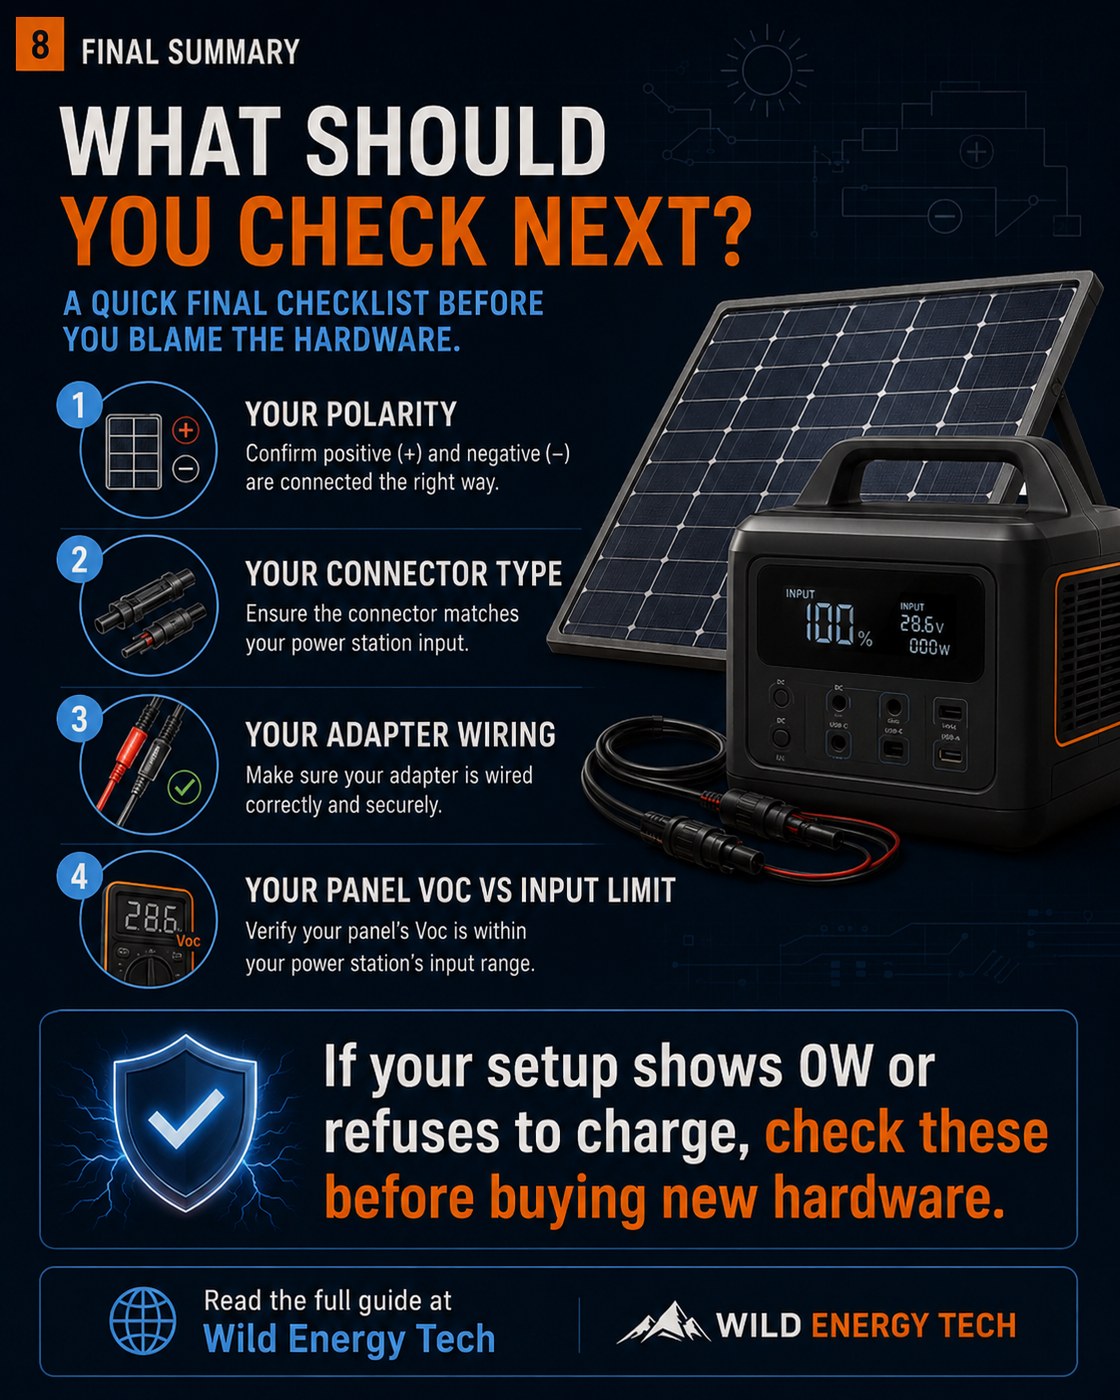
Safety Checklist Before Connecting a Solar Panel
Go through this list every time you connect a new panel, adapter, or cable — not just on first setup. For a more complete check covering voltage, current, and connectors, see the full compatibility checklist.
- [ ] Confirm positive and negative polarity with a multimeter.
- [ ] Confirm panel Voc is within the power station’s input voltage range.
- [ ] Verify the maximum input current (Amps) and wattage limits.
- [ ] Confirm the correct connector type (DC5521, DC7909, XT60, etc.).
- [ ] Determine if an XT60i (intelligent) connector is required for your specific model.
- [ ] Inspect all cables for damage, frays, or poor crimping.
- [ ] Ensure all connections are fully seated and “click” into place.
- [ ] Stop immediately if you see sparks, smell burning, or the adapter feels excessively hot.
Related Wild Energy Tech Guides
- Portable Solar Charging Optimisation Guide
- EcoFlow Solar Charging Stuck at 8A: The XT60i Fix
- Portable Power Station Compatibility Checklist
- Solar Panel Voc vs Vmp Explained for Portable Power Stations
- MC4 to XT60i vs XT60: What Portable Power Station Owners Need to Know
- Why Solar Charging Is Slow on Portable Power Stations
If you are learning how to check solar panel polarity for the first time, remember that the goal is not only to find the positive and negative leads, but also to confirm that the full solar setup is safe for your portable power station.
Final Recommendation
If you are troubleshooting 0W input, polarity is the first thing to rule out — it takes two minutes and requires nothing more than a multimeter. If you are setting up for the first time, check polarity before connecting anything. Confirming the correct orientation now can prevent confusing error codes, poor charging performance, and damage to your power station’s input port. Once polarity is confirmed, check your Voc, input current limit, and connector fit. Those four checks together are what make a solar setup reliable — not just on first use, but every time you connect new hardware.